Showing posts with label DIY. Show all posts

6/15/2015

How to Hang PVC Window Treatments


Lately, I have received quite a few emails in regards to my PVC window treatments I did back in 2012.  The original post can be found here.  The main question I got was, "How did you hang them?" since this was something I never covered in the original post.


I LOVE my PVC windows.  They are so wonderful, and they have held up so great.  I highly recommend them for a window treatment alternative.  It brings in just enough light during the day and just enough privacy in the evening with the added bonus of pattern.  I love pattern.  :)

So this tutorial is stupid easy.  SO easy.  You will smack yourself for not thinking of this yourself once I show you.

In the beginning, I used heavy duty velcro and placed in spots that were not visible from the inside of the house as well as the outside of the house.  That worked fine and dandy until after a few months of west facing sun constantly shining on them made the sticky stuff melt.


That's when I switched over to the plastic mirror clips.  Ew.  Did I just hear your trendy self say 'ew'?  Well, it actually looks really good, in my opinion.  It blends *almost* seamlessly with everything else going on.  I guess I could have used white screws to make them even less noticeable, but I was too lazy to do that.

So you take a packet of these cheap mirror clips that most people have a tendency to want to cover up in their bathrooms, and drill those into doors.  I drilled mine into the moulding surrounding the windows.  I placed one clip on top and bottom and then one of either side.  Because the PVC is flexible, I can pop them out (carefully) and clean them when I want.  See how awesome these PVC treatments are?


On a different note, I AM taking suggestions for a light replacement in this kitchen, so speak up! :)

I guess that really wasn't much of tutorial was it, but is it really necessary to show you a photo of me pretending to drill these into the moulding?  Ha!  I didn't think so either.  Promise me you won't smack yourself too hard. ;)

[Photo from my Instagram account]
On a second note, some of you may have noticed that the library cabinet that was once in my living room is now in between my kitchen and eating area.  I moved it there so I could hang a design wall for my quilting.  The design wall is temporary but the cabinet's new location isn't. (We are thinking of adding a desk here.) It's all about making a home that fits YOU and your needs, which is something I didn't learn until much, much later.

xx nancy
Connect with me elsewhere : Instagram (this is my jam.  this is me microblogging my crafty stuff) Facebook Pinterest 

One year ago: Stockholm in the house
Two years ago: I went black
Three years ago:  DIY Polka Dot Schoolhouse Light
Four years ago: IHOP pancake recipe (they are actually better.  shh.)


My quilting book released Sept. 24, 2015 and is on Amazon.  Check it out!


This post contains affiliate links.  I have to linked to products I personally use.  I receive a small commission, if you choose to purchase anything.  Thank you for supporting owen's olivia.  


11/19/2014

DIY Geometric Ornaments for U-Create


Geometric Ornaments

Hello all!  I am over at U-Create today sharing a simple tutorial.  I hope that you will stop by.  Pin it for later too.  It's so easy, and it is very easy to customize to your tastes.  Have a great day!

Find the tutorial here.

xx nancy

11/16/2014

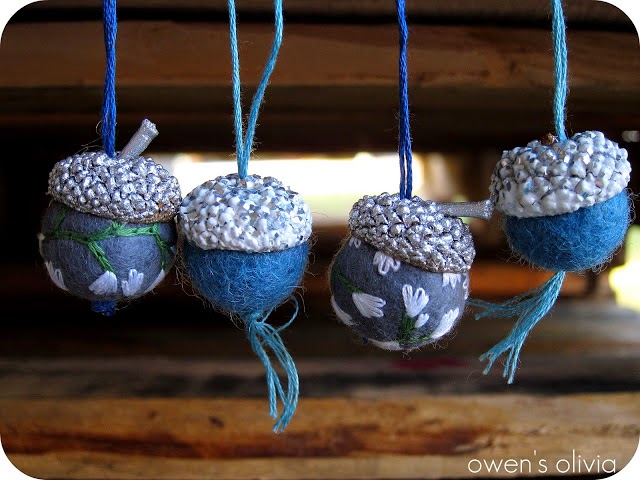
Felt Acorn Ornaments || DIY


Felt Acorn Ornaments || DIY

This is a tutorial that I did for Whipperberry back in 2011.   I am sharing a new ornament tutorial in the coming days, so I wanted to share this tutorial with you as well, especially since Christmas is fast approaching.

I still love my acorns!!   They are still going strong 3 years later.  Owen did destroy a few of them, but I blame that on his toddler behavior.  Now he actually respects the things in my home, for the most part.  :)   I should definitely make more of these though, and they make great gifts.  I even used them to tie around some caramel jars I had made.


Supplies

Felt balls, store bought or you can make your own.
Acorn caps
Hot glue
Needle and embroidery floss


1.   Thread your needle and triple knot the ends together.
2.  Using your needle and something hard (scissors), push the needle through the acorn cap to create a hole.


3.  Push the needle throughout the felt ball and in through the hole you made in the cap.


4.  If you do not want to use hot glue, pull all the way through.  If you want the cap to stay in place, apply hot glue, then push the cap down.


5.  Cut the string at the needle, and tie a knot.  That's it!  You have your acorn ornament!


 Enjoy!

xx nancy

One year ago: High Point Market
Two years ago: Visually Understanding Your Thread
Three years ago: A Tastespotting Thanksgiving || Recipes


2/06/2014

An unconventional way to remove a water stain from wood

Do you remember when I got this table?


Well, the lady who sold it to me said she rubbed it down with a protective oil to help preserve it. She may have done that, but we have been getting a few stains here and there, which resulted in me throwing a cheap vinyl tablecloth over it to protect the wood.  A few weeks ago I ended up with a nasty stain.  Something somehow leaked through the tablecloth and onto the table.  I didn't even know it nor did I know how the long the stain had been there until I had taken off the tablecloth.  Needless to say, the wood had turned white.


The other day I was playing Go Fish with my 3 year old, and we were snacking on Lay's Wavy potato chips.


I noticed these little grease spots showing up, and I had the craziest idea to rub the inside of the bag of chips onto my water stain.   I figured it couldn't hurt.


Well, guess what.  It worked.   I cut a small piece of the bag and rubbed the oily side onto the table in a circular motion.  Within seconds, the stain was gone.  I wiped the table down with clean damp cloth to check if it was just a hoax.  The stain was gone. (!!!)


A few things to note:
This worked for me and may not work for you.  I thought this was a crazy idea and just wanted to share it.
My table is solid wood teak with no veneers.
My table does not have any protective coating like Polyacrylic or stains.
I didn't use a lot of oil.  If I needed more, I cut another small piece from the bag.

Have you found a successful way to remove water stains?  Do share!

xx nancy

One year ago: Triple Zip Pouch
Two years ago: Fabric Friday || Triangles


1/23/2014

A quick trip to UT || Cricut Explore


I say quick, but it was actually a week long trip!  Awhile back, Cricut contacted me to see if I wanted to come out to UT for the reveal of their newest product.   I said heck yeah!  I flew out with about a hundred other bloggers and businesses to see the new Cricut Explore in person.  I feel blessed and honored beyond measure that I was able to be part of it.  It was really exciting!

Now, it may seem like I have ulterior motives while I spit stuff out trying to get you pumped for this new product from Cricut.  Yeah, they flew me out and took really good care of me, but there's something you need to know.  Cricut worked their tails off to provide a new product for the DIY community.  They have extensively researched how they could make this a product that people really want to use.  Not just to sit on a shelf and one day use, but actually use it.  The company focused on three key words, which is the summation of the Cricut Explore.

EASY. PRECISE. VERSATILE.


Y'all.  It's easy to use.  Very little buttons.  There's a few steps to getting around on the computer portion, but it's really not that difficult.  They tried really hard to make things easier for the user because who wants to craft when it's hard?  Seriously.  Um, four buttons and one dial.  Simple.


It's precise.  You can get fine tips, delicate curves, and cut as small as a 1/4".


It's versatile.  It works with your old Cricut, meaning you can download all your cartridge images onto the new Cricut!  It's wireless, so you have the ability to work on it from you iPad.  It's quiet.  Like you can craft next to your sleeping baby quiet.  You can use the same cutting blade for all sorts of mediums.  What can be used on silk can then be used on cork board.  They also include a storage tote, which is never mentioned on the package!  It's a nice a little surprise.

So here's a little info:

-Individual images- starting at .99 cents.
-No commitment; cancel anytime; monthly or yearly subscriptions
-Access to 25,000 images and 200 fonts - $99.99
-There's free access to play around, so you are not committed to buying something you think you may like.
-If you create a project using their images but then cancel, you still keep your project!
-You can design your own images to cut!
-SVG files are supported
-The machine can score, cut, and ink at the same time!

This machine will be available mid-March and retails for $299.  You will find Cricut Explore at Amazon, Jo-Ann, Michael's, and Walmart.com.

Interested in seeing what people are doing with this machine?

Follow hashtags  #ExploreCricut and #OfficialCricut

It's going to BLOW your mind.

So what do you think?  Are you excited to get your hands on this machine?

xx nancy

Find me elsewhere:  Instagram, Pinterest, Facebook, Bloglovin', and Etsy.

*I was not compensated for this post, but I am receiving an Explore.  I just want to share with you a new product that I think you will enjoy as much as I do.  All opinions are mine.


1/06/2014

A Schoolhouse Electric Inspired Bed

The bed is DONE.   I bought the bed off Craigslist back in October, and it was in rough condition with rust and chipped paint.  A little elbow grease and I turned my find into a Schoolhouse Electric style bed.   I originally did not choose black for the color, but it only seems natural to have it now that I look at it.  I asked my 3 year old what color he wanted his bed, and I was willing to paint it any color he chose.  He said black, and I asked him if he was sure about that.  He said yes, and I said heck yeah!!!


Yep, I went there.  I wrapped fabric around his metal headboard.  I will definitely go there again, if the opportunity ever arises.


Do you remember when I bought this bed?  I blogged about it here along with sharing some inspirational photos.  Although I was a fan of the chipped paint look, it tested positive for lead, so I sanded it.  I used some black paint I had on hand, which was interior house paint and then applied Polyacrylic over it.  I used a cheap brush from Lowe's, which seemed to do just fine for this bed.


And do you want to know the biggest bonus of having this bed besides the ability to sleep guests?

STORAGE.

Something our small home lacks.


And we all like before and afters, right?  Although, the before was really nice too.  :)


There's something about that zebra in the picture above that makes me smile.  I think it's the way it has collapsed over from exhaustion and is smiling.


Thank goodness Owen loves his new bed.  Now if I can only get him to sleep in it the entire night ...
xx nancy


Bedding is from Ikea and Target.  Cloud pillows made by me.  Zebra from Pier 1.  Woven basket Nate Berkus for Target.

Related posts:

Paint color options for the bed
Owen's room with a source list

One year ago:
Catalog Quilt finish
Two years ago:
Kitchen Tile


My quilting book released Sept. 24, 2015 and is on Amazon.  Check it out!


12/31/2013

Top 10 Posts in 2013


2013 was a slower year for readers, but definitely not for me.  As I reduced my posts, traffic stayed strong throughout the year.  You may be wondering why the reduction in posts this year, but back in January of 2013, I committed myself to my motto, "Quality over Quantity."  And I did just that throughout the year.  I'm thankful for my motto and my ability to stick with it, and I will definitely use it to carry me through 2014.

A few highlights this year for me.


  • A 4 month summer long vacation in San Diego, California while my husband interned at Qualcomm.
  • Checked seeing Garth Brooks live in concert off my bucket list.
  • Got to see The Postal Service in concert.
  • I competed in Creating with Stars hosted by East Coast Creative.
  • Met and chatted with Candice Olson.
  • Several opportunities to work with larger companies in the 2013 and the 2014 year.
  • I was published in two magazines - Homespun + kleinformat
  • Matt, his poor 34 year old soul with a family, finally graduated with his electrical engineering degree. (still working on that master's though)
  • A few shout outs on larger blogs like Young House Love, Apartment Therapy, Craft Gossip, and U Create.
  • Created and sold my very first sewing pattern, Wonky Triangles.
  • This was my first year of real quilting.
  • I opened up publicly about my past.


Let's take a look at the top 10 posts of this year, excluding giveaways, which has a nice mixture of home decor and sewing.

#10

The day I said screw it and went all black.


#9

The popular Let's Get Acquainted! Blog Hop.  A nice, quick read for anyone new to this blog and enjoys sewing.


#8

Get your hex on with this clock.


#7

The Triple Zip Pouch


#6

Flying Geese Mini Quilt.  Still one of my favorite finishes.


#5


25+ Sharpie Projects || Roundup


#4

A bedroom makeover for a family adopting.


#3
I may have tricked a few of you with  "A new addition to the family."


#2

DIY Illuminated Sign


#1

$5 wall treatment  With the use of a projector, the internet, and a Sharpie, this could be yours too.


I hope your year was awesome.  If not, you're human.  It's easy to focus on the could of, should of, would of's in your life, but now is the time to move forward and not look back.  There's probably a lot I would have changed or done differently, but that is what makes human life so interesting.  We change.

Cheers to a new year with 365 days of possibilities!

xx nancy


Find me elsewhere: Instagram, Pinterest, Facebook, Etsy, and Bloglovin'.

12/18/2013

New Read || SCOUT by Lisa Tile || DIY and Crafting Digital Magazine


I have been following Lisa Tilse of the red thread blog for quite a while now.  She is a huge inspiration to me, and I just absolutely love her work.  I think you will too.  I am anxiously awaiting for my copy, and I just know that I will love every page and project.  At $10 for a copy and 146 pages of work (all ad free), I know this is a bargain!!  Click here to get your copy today.

Copyright © owen's olivia. All Rights Reserved.
Blogger Template by The October Studio