Showing posts with label gifts. Show all posts

12/02/2014

Half Star Mug Rug Tutorial + How to Match the Binding to a Design + Giveaway!

Half star tutorial, and how to match the binding to a design in a quilt.  


This tutorial is part of the Ellison Lane's Merry Mug Rug Hop.  


 I am so happy Jennifer asked me to be a part of this.  I am actually surprised she asked considering I find sewing for the holidays to be difficult.  Not because of the time, but because I just generally have a hard time with Christmas-y decor (or any holiday decor for that matter).  And it's my FAVORITE holiday, and I SEW!!  So weird, I know.   But I am eternally grateful for all the times Jennifer has believed in me and that she still likes to include me in her special hops.  :)  (Thank you!!)

This mug rug design came from what was mentioned above.  I wanted to create something that could be Christmas-y, yet something that, if was out during the year, no one would say, "Isn't that a Christmas mug rug?"   And so the Half Star mug rug was born.  It is simple, minimal, and looks oh-so-lovely on a table or wall.  

This hop runs from Dec. 1st - 11th, and each blogger participating is sharing a tutorial!  So please check out the other participants. They are going to be great!  You'll need to head over to Ellison Lane to enter to win a gift certificate to Southern Fabric, which ends 12/14/14.   

 If you end up making this project, I would love to see it!  #halfstarmugrug and my handle on Instagram is @owensoliviaquilts.  Or share it with me on Facebook.  


Materials

Finishes 8 1/2" square.

From the green fabric (Kona Palm)
-Cut one 4 1/2" x 8 1/2" strip, two 2 1/2" squares, and one 4 1/2" square.

From the white fabric (Kona White)
-Cut one 4 1/2" square.
-Cut one 2 1/2" x 4 1/2" strip.

Binding
-Cut one 2 1/2" x WOF strip.  Cut in half.  
-Cut one 2 1/2" x 8" strip.

10" square of batting
10" square of fabric for backing
Elmer's Glue with a fine point glue tip (mine is from Pile O' Fabric)
Small ruler
Fabric marking pen
Aurifil Mako 12 2024 for handstitching


How to

1.  Sew right sides together the two 4 1/2" squares along all four sides using a 1/4" seam.  


2. Cut diagonally across making an X to create four HSTs.  Press seams open or to the side.


3.  Trim HSTs to 2 1/2" square.


4.  Layout your pieces as pictured.


5.  Sew together the top and bottom two squares.  Sew the two middle squares together.  Press seams open.


6.  Sew the two middle pieces together to create a square.  Sew the top and bottom pieces next.  Sew the right side piece last.  Press seams open.  


7.  Lay your backing right side down, then your batting, and then your top face up.  Quilt the pieces together.  I chose to hand quilt using Aurifil Mako (love!).


How to match the binding to a design in your quilt

1.  Sew together one green strip to the white strip like you normally would in making binding.  Fold your binding in half around the white and green area and press.  Fold the raw edge 1/4" and press with a hot iron to create a crease.


2.  Lay the binding right side up matching the edge along the quilt's edge, as if it were already sewn down and flipped back over to bind on the backside of the quilt.  Line up the white line perfectly, and glue baste into place by placing a dot of glue onto the quilt in the seam and heat setting with an iron.  Glue basting will not damage your quilt or iron.


3. Using a ruler and marking pen, align the ruler along the diagonal line of the HST.  Make a mark onto your binding.  THIS IS YOUR SEAM LINE.  Remove the binding (it will easily pull off with a slight yank), and open up your binding.  Finish drawing your diagonal line onto the white area.


4.  Place your other green binding strip like so in the photo.  Pin into place, and flip the binding over, so you can see your marked line.  Sew on the line.


5.  Before trimming the seam to 1/4", fold the binding back into place to see if it does indeed match.  It is easier to fix with extra binding than it is without it.

6.  Trim the seam, and sew on the binding as normal.  I use Elmer's glue to hold the binding exactly where I want it to be when sewing the binding on, and I sewed the white spot on first to get it exactly where I want it.


Merry Christmas!

xx nancy

Find me here too!

Pinterest
Instagram 1  (personal side + home decor)
Instagram 2  (quilting + sewing only)
Facebook

One year ago: Minimalista Quilt
Two years ago: Christmas Stocking Tutorial
Three years ago:  Christmas Dinner Recipes + Settings


My quilting book released Sept. 24, 2015 and is on Amazon.  Check it out!


8/09/2013

For Britt || A Swoon Pillow


Britt was married for all time and eternity in the Mesa, AZ LDS temple awhile back.  Her wedding colors were yellow and gray (sweeeeet!), so a pillow for the new bride and groom seemed fitting.   I got to get my swoon on, and Britt now gets a dose of lovely on her couch, bed, or sitting chair.


It's all in the details . . .


 Vanessa Christenson is rocking those chevrons.  Am I right?!  I really like this print from her simply style collection.

My original plan was to use gingham fabric.  I embroidered the state of AZ and included a little heart representing the Mesa area.  My next intention was to add their last name and 2013, but a little accident happened.  I misplaced my fabric pen, and my stitching became crooked from eyeballing everything.  It just didn't look hot, so I opted for this chevron fabric instead.


Picture from my Instagram.

I like how this accident happened.  I chose not to embroider on their pillow because I felt it just didn't need it with the chevron backing and would become distracting.


I know some people could care less if directional prints stay in the right direction in a swoon block, but for some reason, it drives me bonkers when they are not.  Am I the only one who has this weird quirk?

So after working hard on my beautiful pillow, it was not until AFTER I took photos that I realized one stinking block was facing the wrong way.  Seriously???  The one block that required little thought nonetheless.


Fixing that was a total pain but worth it in the end.  Thank goodness this pillow has a zipper!!


Swoon blocks are usually large, but I purposefully made mine small at 12".  Although I do like the look and idea of using a swoon block for an entire pillow, I feel that, sometimes, the design is lost by the curvatures of the pillow.   By framing the block, it allows the person to see the design without compromising the aesthetic look of a down filled pillow.


And that's the story of Britt's Swoon Pillow.

Other fabrics used:
Riley Blake Willow Herringbone
Essex Linen in Black
Kona White and Curry
Daisy Jane Mumsy


I hope you all have a good weekend!  I am cleaning our apartment from top to bottom today.  We drive back to NC this evening!!  We are heading to UT, to CO, to KS, to TN, and then finally to NC.  We'll be on the road for a little over a week.  I'm excited to get back home after this 3 month long vacation.  I'm ready to get back and spruce up our home!  :)

peaceout

2/05/2013

Triple Zip Pouch || Sewing Post


karlynpouch


karlypouch2


karlynpouch3


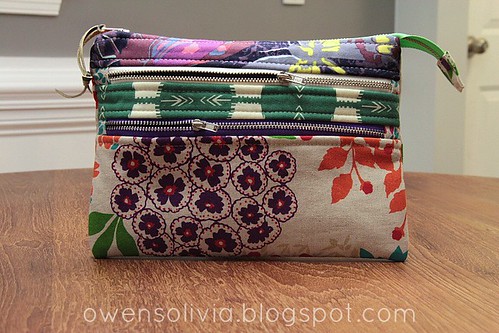
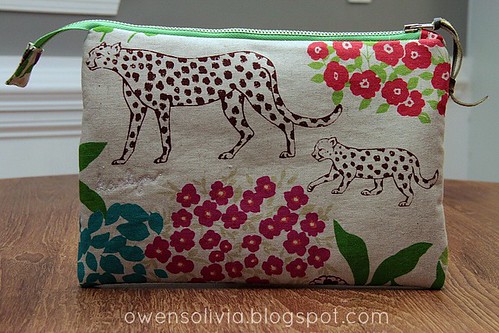
It's always a risk to show off photos of gifts before giving them.  The likelihood of the person who is receiving this gift reads my blog is very low.  So I am taking a risk and sharing with you my completed triple zip pouch that I made for Karlyn, my teenager niece.  And if Karlyn is reading this post - Happy Birthday!  It's not my fault you chose to read this one and only post!  ;)  I have one more I need to make but I haven't done it yet, and I'm already contemplating making one for myself too.  Debbie from A Quilter's Table created this pattern that features three zippers on one pouch.  I had no problems with it, but I did use my seam ripper a lot.  Also, I ended up doing the last few steps differently.  Mine is a little bigger too measuring 10" x 7" and has the zipper extended off the pouch.  You can head on over to the Flickr group to see what all the other talented people have created from this pattern.

I'm sure you'll see more photos of this pouch when I photograph the second one.  (These are the photos used for the Flickr group.)


peaceout
Relevant links: Other gifts I have sewn
For Gracie
For Lucy
For Maeghan
For Olivia
For Nicole


My quilting book released Sept. 24, 2015 and is on Amazon.  Check it out!


12/14/2011

Wrapping Paper & Trimmings

source
source
source

source
source

source
source
source
source

source

source

source
source
source

source
source

source


Here are some beautiful options (with a tutorial) from Marabous for trimming.  I think these would also look great on almost any wrapping paper, and they look oh so lovely.


Here are some free printable gift tags you could use.  I found these at Get Buttoned Up.


If you like more whimsical tags, I found these free ones at We Love to Illustrate.


And if you like simplicity, here are ones from Compulsive Craftness.  Free too!


The new home ec offers 20 different wrapping ideas. These are just cute.


I found these cute felt holly corsages through Martha Stewart. You could easily add hot glue to the back of the holly corsage, and place on your package.


source

 Do you like to use wrapping paper, or do you like to use fabric, newspaper, or some other kind of medium?  Do you like to make your own gift tags?


Please take 10 seconds and vote for me today.  If you lived near me, I'd give you cookies or something.  I need those votes! :)  I'm #44, and you can vote here.

Don't forget to check out the other holiday posts.
Friday- Holiday Fabric
Mon- My Wish List with a few Favorite Things
Tues- Christmas with Etsy
Thurs- Christmas Dinner Ideas & Table Settings
Copyright © owen's olivia. All Rights Reserved.
Blogger Template by The October Studio