Showing posts with label guide. Show all posts

4/12/2013

DIY Illuminated Hello Sign || tutorial


This was my project for Round 2 in Creating with the Stars on East Coast Creative.  I had one week to knock off anything my heart desired.  Instead of copying something exactly, I chose a more creative route and used Restoration Hardware's Illuminated Arrow as my inspiration.


Supplies:

1" Diameter  wood dowels cut to 3"
2 large sheets of Foam Board,** cut to size (2) 3.25" x 12" AND (2) 3.25" x 31.5"
2 pieces of hardboard +,  cut to the size 12" x 31"
Scrap piece of wood larger than your hardboard
Drill with a drill bit size of 7/32
wood glue
Hot glue
220 sanding block
Christmas lights (I used outdoor lights from Home Depot)  TEST them first before beginning!
On/off light cord (Home Depot and Lowe's carry these as well.)
2 yellow end caps for electrical wires
Rustoleum Lagoon spray paint
Folk Art Metallic paint in Pearl
Picture wire for hanging


With a pencil, I wrote hello on the smooth side of the hardboard.  There were 100 lights on my strand, so I penciled in 100 dots trying my best to evenly place them apart.


Placing my scrap piece of wood under the hello sign, I drilled into the dots going into the smooth side first because the drill pushes the hardboard out of the way.   After all holes are drilled, use a 220 sanding block and sand over the top of the hello sign.  Sand the edges as well.

Using my cut dowels, I glued them into place using wood glue. ** I placed one in each corner and then I filled in the rest of the board making sure to not get too close to my letters.


Hot glue the foam board to the sides of the hardboard.**


Take your piece outside, and spray paint.  Let dry completely.  To give it it's iridescent finish, spread a little of the metallic paint over the blue using a paper towel.  A little goes a long way, so be careful.


Now it's time to make your Christmas lights available with ON/OFF capabilities.


HOW TO COMBINE CHRISTMAS LIGHTS AND ON/OFF LIGHT CORDS

1. Cut off the end of your swag light.  Peel back some of the rubber to expose the copper ends.

2. Cut off one end of your Christmas lights.  Peel back some of the rubber to expose the copper ends.

3.  Combine one white and one black cord and twist the copper pieces together.  Insert into an end cap and turn it tightly to secure the ends.  The cap should not fall off.   Repeat for other strands.

Now your Christmas lights have an a dial to turn off and on!


Push your Christmas lights through every hole.


To hang, I simply wrapped picture wire around one dowel in the middle and connected it to another dowel on the opposite side.  The box is fairly light.  Duct tape is great to use to keep the cord from falling out.


+ If you want your back covered, which is something I chose not to do, you will want to cut out a hole in the second piece of hardboard.  Your light cord will go through that hole.  I would place wood glue on top of the dowels and place the hardboard on top of that.  Christmas lights take forever to burn out, but if you are afraid of having to take the back piece off in the near future, I would choose to not use a back at all.

*If you are wanting to make a light that has a curve, you will need to use flexible, bendable material in place of the Foam Board.  Vinyl roof flashing or foam may be an option for you, but I have not tried these methods.

** Since I had never made one of these before, I didn't know the best way to approach the project.  I just figured things out as I went.  One of the things I discovered but did not have time to fix due to time constraints in the contest was that the foam board produces a less than great finished edge.  Using what I had on hand, I used Durham's Rock Hard Water Putty.   It may not have been the best thing to use to finish my edge for this project, but it got the job done in time for the contest.   You may want to take a different approach.  One option is you could place the foam board directly onto the hardboard instead of next to it like I did.  That way the hardboard covers the top of the foam board, but you will need to glue your wood dowels at least a 1/4" away from the edge to allow room for the foam board.  Or you could do as I did and find something to fill in the foam board edge to make it look nicer and more complete.


(My lights are not green and red in the dark, but give off a soft yellow color at night.  Very pretty!)


Did I miss something?  Very easy for me to do.  Just leave me a question if you need help!


peaceout

4/01/2013

Horse Stamp || Tutorial


After seeing my horse couch I made for East Coast Creative, I had several people request the tutorial for the horse stamp.  Making a stamp is very easy, and you could make any shape, pattern, or design of your choice.


Here's how I made mine.

I Googled "free black vector horse."  Click on "images."  It will pull up a lot of horses for you to choose from.


After picking out my horse, I drew it onto my 5" x 7" linoleum block that I purchased from Michael's in the painting department.  I am fine with looking at something and drawing it as is, but I know many people cannot do that.  If you are one of those people, I suggest printing out the picture and tracing it onto the block.

Here's a TIP:  Remember the stamp will print in the reverse.  Important if you stamping out names or anything else that is needs to face a certain way.


To carve out the horse, I used a few wood working tools.  One is a knife to get into the really tiny areas, and the other one is a V parting tool that has a small V tip. I used the knife to cut along most of my drawing lines, and I used the V tool to carve out the rest.  I recommend practice cutting in the negative space of your stamp since that will be removed anyways.  That way you can get the hang of it before you attempt your design.   You can also use your knife like you do to peel apples and such with a paring knife, but be very careful as to where you place your hands!!

But it's really easy to carve.


I would recommend testing the stamp on a scrap piece of paper.  That way if you have any spots that are as high as the design itself, you can carve those out.


Pretty easy, huh?

For my couch, I used silk screening ink because I found the latex paint dried too quickly on my stamp. Fabric ink needs to be heat set, but for the competition, I did not do that.

If stamping on textured fabric like I did, it could result in this:


I really like what B Mom had to say when she commented on this post.  I think she summed up exactly what I was thinking when I made this couch.   She said, "I think this project could fuel some other great applications - that horse stamp could be really cute on curtains, around the sides of a big square ottoman, to punch up a powder room wall, on the bottom of a wood tray ..."


And I would like to add that you do not have to make a horse.  You could make a different design using the same applications above.


 Have fun!  If you have any questions, feel free to leave them in the comment section.


peaceout

11/16/2012

How to remove rust from metal || A ridiculously easy tutorial


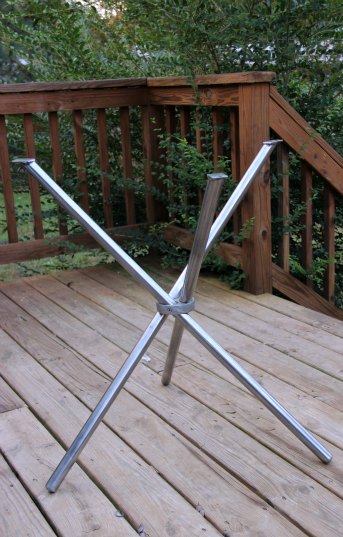
Earlier this week I shared with you my new-ish dining table.  When I had bought it, there was some rust on the legs.  The owner said she stored the table outside, which explained the rust.  I didn't let it deter me from buying the piece though because I knew that it could be easily remedied.  You can apply this quick trick to anything that has metal legs.  I'm sure this could also work on just about anything metal as well.

Supplies needed:


  • Steel wool in medium and fine grade  (If there is a heavy amount of rust, you may want to try coarse.)
  • A mask.  Steel wool releases the tiniest of particles when used, so it freaks me out that I could be inhaling it.  
  • Gloves if you cannot handle the way steel wool feels between your fingers
  • Damp and dry cloths for cleaning afterwards

Step 1 - If you can, take your project outside.  To remove rust, simply take your medium steel wool and rub it against the metal going in all sorts of directions.  Up and down, circular, side to side.  Scrub until you have removed all the rust.  After the rust is gone, you will use the fine steel wool and repeat.  This fine tunes everything and makes it all shiny and pretty.


The left leg is done.


Step 2 -  Take your damp cloth and wipe down your project.  Steel wool releases small particles, so I like to know I'm not taking this back into my home.  Dry your piece well to insure no rust will form again.


This is why you should wear a mask!


A brand new looking base.


That's it!  Told ya it was crazy easy!  :)

To see the tripod dining table in my home, please click here.


xx nancy


My quilting book released Sept. 24, 2015 and is on Amazon.  Check it out!


10/02/2012

Your Sewing Thread Under A Microscope || Visually Understanding Thread Quality


  This post is in no way to influence you to one brand or another.  I was not paid by any thread company for this post.  

After purchasing my first sewing machine, it sparked a desire to learn more about sewing thread quality since I suffered from a lot of issues with my last machine.  There are hundreds of sewing threads to choose from, and I find it to be a bit overwhelming.  Though my BERNINA came with Mettler thread, I have heard great things about Aurifil, and I couldn't wait to try it out on my machine.  But it got me thinking about why the Mettler brand came with my machine.  Does it meet BERNINA standards?  Or is there a contract between Mettler and BERNINA?  Or does my BERNINA dealer favor Mettler above all other brands?   And what is the fuss about Aurifil?  Is it really that great?  How do these brands compare to those available at JoAnn Fabrics?

9/11/2012

What I have learned from blogging over the year


Not too long ago this blog reached a year old.  It got me thinking about the past year, and what I have done and not done.  What I would like to do and not do.  What I can do and cannot do.  I thought I would share with you my thoughts on blogging, and what I have learned from it so far.  This is my personal experience, and it will differ from yours, if you blog.  

1/02/2012

how to paint chevrons tutorial {readers requests}


 I am posting my tutorial on the chevron walls in my home.  We have seen chevrons throughout many blogs and in interior design.  Some people hate them.  Some people are tired of them.  Some people cannot get enough of them (that would be me).  To be quite frank, I think I sat sat on this post out of the fear of chevron hate mail.   So I feel honored that there are some of you who want me to teach you how to make this design.   Thank you so much; you guys are the best.

I wrote up this post back in the day (okay, not really that long ago) when I shared photos of Owen walking down my hallway.  Some readers asked about the walls and how I did them, and then I received an email recently asking about my walls again.  Thank you for kicking me in the butt to get this posted and overcoming my fear of hate mail.  All I needed was a finale shot, and the other day was perfect.  Matt was home to tend to Owen, so I could take some pictures.  Otherwise, toys and random poses of my son would be included.  Let's be realistic here.  I can't make the room look nice when a toddler is running around, tearing things up, and making a new mess after I just cleaned up the last mess.  Oh, and let's not forget to mention the crusty, sticky finger prints all over my coffee table.


How the wall came about

When we first moved into our home, we had a somewhat long, narrow hallway that was beige.  It was the traditional painter's beige that is found in most remodeled or new homes.  I faced a dilemma because part of the hallway's wall was exposed in my living room.  I thought about putting up a huge picture or grouping frames on this bare wall that faces our front door.   You know, something like this.


Because the hallway was long, I felt that it needed something on the walls.  Another dilemma I faced was the width of the hallway.  If I were to put pictures down the hallway, people would have to stand close to the opposing wall just to get a good look at them.


A LIGHT BULB CAME ON.

9/06/2011

Pillowcase Dress & Barrel Monkeys {tutorials} . . . LOVE IT! {Blog Features}

One of my readers, Michelle from Delicate Construction, made a darling dress/shirt out of 
a pillowcase!  Most of us have extra pillowcases hanging around. Well, at least I do.  I tend to lose one out of the set, so that typically leaves me with one pillowcase.  UGH!
This is an excellent way to use up those pillowcases!
Bonus?  There are a lot of cute patterned pillowcases, and these patterns you typically won't see 
 in a Joann or Hancock's.  This broadens your fabric choices!


How adorable is that???  

You can see Michelle's tutorial here where she teaches you how to make one.

Can we say this is a perfect {thrifty} idea for a baby gift?
I do not know about you, but us Mormons pop out more kids than anyone I know, so that means lots of baby showers. :)


After you get done making that adorable pillowcase shirt or dress, head on over to Sew Stylish Boutique (more wonderful readers of mine), and check out their barrel monkeys!
I love new (and cool) toys, especially now that I have a toddler who is always looking
for new things to play with.
I could also see this as a teether, so make some monkeys and the dress for an adorable baby gift.


How fun is that???

You can see Rose and Heather's barrel monkey tutorials here.

8/29/2011

KitchenAid Mixer Rehab {DIY}

Rehab:


My KitchenAid mixer needed 1b and 2b.  It was literally dying in my kitchen.  Who knows what the hubby and I were thinking when we thought Pistachio Green would look good in our kitchen.  We do not own any retro decor, and that is exactly where my mixer belonged.  (We I originally chose this color because I wanted to please my man.  Hubby's favorite color is green, and I am absolutely clueless.  It doesn't mean I have to buy everything green.)

So . . . what does a cheap person do?

Copyright © owen's olivia. All Rights Reserved.
Blogger Template by The October Studio