12/27/2014

End of Year Sale || Bobbie Lou's Fabric


Hello! I wanted to quickly let you know that Bobbie Lou's Fabric is having a sale!  Chelsea offers a nice selection of designer quilting cottons as well as some fun Premier Prints for the home!  Go check it out!

Get 20% off on all orders through the website or Etsy shop.  Enter code BYEBYE2014.  Ends midnight MST 12/28.  Free shipping as always on orders $50 or more.  :)

Happy shopping!  xx


12/02/2014

Half Star Mug Rug Tutorial + How to Match the Binding to a Design + Giveaway!

Half star tutorial, and how to match the binding to a design in a quilt.  


This tutorial is part of the Ellison Lane's Merry Mug Rug Hop.  


 I am so happy Jennifer asked me to be a part of this.  I am actually surprised she asked considering I find sewing for the holidays to be difficult.  Not because of the time, but because I just generally have a hard time with Christmas-y decor (or any holiday decor for that matter).  And it's my FAVORITE holiday, and I SEW!!  So weird, I know.   But I am eternally grateful for all the times Jennifer has believed in me and that she still likes to include me in her special hops.  :)  (Thank you!!)

This mug rug design came from what was mentioned above.  I wanted to create something that could be Christmas-y, yet something that, if was out during the year, no one would say, "Isn't that a Christmas mug rug?"   And so the Half Star mug rug was born.  It is simple, minimal, and looks oh-so-lovely on a table or wall.  

This hop runs from Dec. 1st - 11th, and each blogger participating is sharing a tutorial!  So please check out the other participants. They are going to be great!  You'll need to head over to Ellison Lane to enter to win a gift certificate to Southern Fabric, which ends 12/14/14.   

 If you end up making this project, I would love to see it!  #halfstarmugrug and my handle on Instagram is @owensoliviaquilts.  Or share it with me on Facebook.  


Materials

Finishes 8 1/2" square.

From the green fabric (Kona Palm)
-Cut one 4 1/2" x 8 1/2" strip, two 2 1/2" squares, and one 4 1/2" square.

From the white fabric (Kona White)
-Cut one 4 1/2" square.
-Cut one 2 1/2" x 4 1/2" strip.

Binding
-Cut one 2 1/2" x WOF strip.  Cut in half.  
-Cut one 2 1/2" x 8" strip.

10" square of batting
10" square of fabric for backing
Elmer's Glue with a fine point glue tip (mine is from Pile O' Fabric)
Small ruler
Fabric marking pen
Aurifil Mako 12 2024 for handstitching


How to

1.  Sew right sides together the two 4 1/2" squares along all four sides using a 1/4" seam.  


2. Cut diagonally across making an X to create four HSTs.  Press seams open or to the side.


3.  Trim HSTs to 2 1/2" square.


4.  Layout your pieces as pictured.


5.  Sew together the top and bottom two squares.  Sew the two middle squares together.  Press seams open.


6.  Sew the two middle pieces together to create a square.  Sew the top and bottom pieces next.  Sew the right side piece last.  Press seams open.  


7.  Lay your backing right side down, then your batting, and then your top face up.  Quilt the pieces together.  I chose to hand quilt using Aurifil Mako (love!).


How to match the binding to a design in your quilt

1.  Sew together one green strip to the white strip like you normally would in making binding.  Fold your binding in half around the white and green area and press.  Fold the raw edge 1/4" and press with a hot iron to create a crease.


2.  Lay the binding right side up matching the edge along the quilt's edge, as if it were already sewn down and flipped back over to bind on the backside of the quilt.  Line up the white line perfectly, and glue baste into place by placing a dot of glue onto the quilt in the seam and heat setting with an iron.  Glue basting will not damage your quilt or iron.


3. Using a ruler and marking pen, align the ruler along the diagonal line of the HST.  Make a mark onto your binding.  THIS IS YOUR SEAM LINE.  Remove the binding (it will easily pull off with a slight yank), and open up your binding.  Finish drawing your diagonal line onto the white area.


4.  Place your other green binding strip like so in the photo.  Pin into place, and flip the binding over, so you can see your marked line.  Sew on the line.


5.  Before trimming the seam to 1/4", fold the binding back into place to see if it does indeed match.  It is easier to fix with extra binding than it is without it.

6.  Trim the seam, and sew on the binding as normal.  I use Elmer's glue to hold the binding exactly where I want it to be when sewing the binding on, and I sewed the white spot on first to get it exactly where I want it.


Merry Christmas!

xx nancy

Find me here too!

Pinterest
Instagram 1  (personal side + home decor)
Instagram 2  (quilting + sewing only)
Facebook

One year ago: Minimalista Quilt
Two years ago: Christmas Stocking Tutorial
Three years ago:  Christmas Dinner Recipes + Settings


My quilting book released Sept. 24, 2015 and is on Amazon.  Check it out!


11/19/2014

DIY Geometric Ornaments for U-Create


Geometric Ornaments

Hello all!  I am over at U-Create today sharing a simple tutorial.  I hope that you will stop by.  Pin it for later too.  It's so easy, and it is very easy to customize to your tastes.  Have a great day!

Find the tutorial here.

xx nancy

11/16/2014

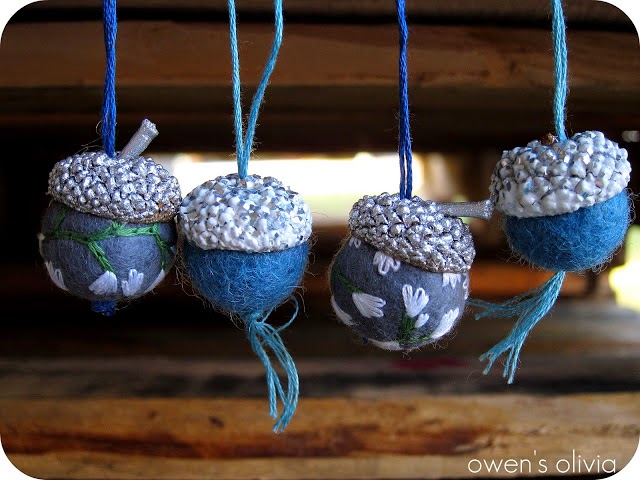
Felt Acorn Ornaments || DIY


Felt Acorn Ornaments || DIY

This is a tutorial that I did for Whipperberry back in 2011.   I am sharing a new ornament tutorial in the coming days, so I wanted to share this tutorial with you as well, especially since Christmas is fast approaching.

I still love my acorns!!   They are still going strong 3 years later.  Owen did destroy a few of them, but I blame that on his toddler behavior.  Now he actually respects the things in my home, for the most part.  :)   I should definitely make more of these though, and they make great gifts.  I even used them to tie around some caramel jars I had made.


Supplies

Felt balls, store bought or you can make your own.
Acorn caps
Hot glue
Needle and embroidery floss


1.   Thread your needle and triple knot the ends together.
2.  Using your needle and something hard (scissors), push the needle through the acorn cap to create a hole.


3.  Push the needle throughout the felt ball and in through the hole you made in the cap.


4.  If you do not want to use hot glue, pull all the way through.  If you want the cap to stay in place, apply hot glue, then push the cap down.


5.  Cut the string at the needle, and tie a knot.  That's it!  You have your acorn ornament!


 Enjoy!

xx nancy

One year ago: High Point Market
Two years ago: Visually Understanding Your Thread
Three years ago: A Tastespotting Thanksgiving || Recipes


11/10/2014

Pattern Parcel #7


Hello!  Awhile back I agreed to make a sample from one of the patterns from Pattern Parcel #7.  If you are like I was, you may be unfamiliar with Pattern Parcel.

Pattern Parcel #7: Choose your own price and support DonorsChoose. Win/win!


Pattern Parcel has a simple mission in mind.  The company offers sewing enthusiasts the chance to support indie designers and children's education by allowing the buyers to choose how much they would like to donate when purchasing the parcel.  Here is what they have to say in regards to supporting children's education.

Donors Choose is an organization that matches up the needs of teachers and their students for specific projects with willing donors.  The funds raised from each Pattern Parcel sale will go to help K-12 students in minimizing educational inequality and encourage a community where children have the tools and experiences necessary for an excellent education.  

Each parcel is unique with a theme in mind.  This month's parcel is focused on handbags.  Once the parcel time is up, the bundle package is gone.  The buyer will then need to purchase the patterns individually.  Don't want to sew all the patterns within the collection?  That's ok.  You purchase what you think the patterns are worth to you.

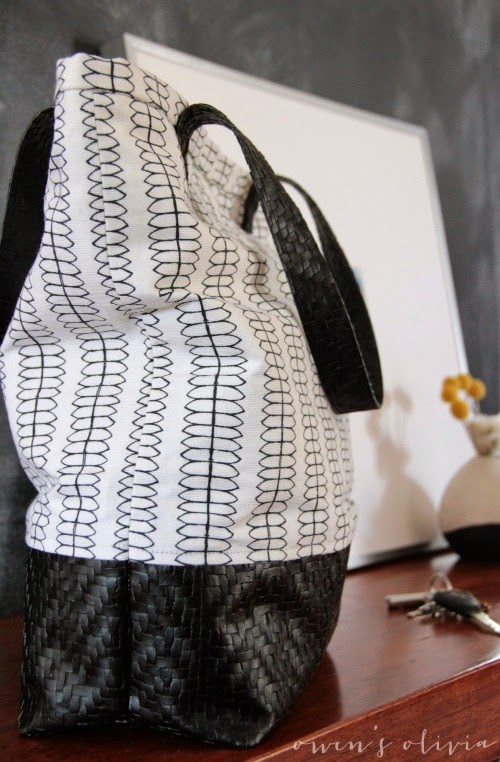
Pattern Parcel #7 includes 5 patterns, but choose a price of $32 or greater and you will automatically be sent the Bonus Pattern.  That's just over $5 a pattern!  The bonus pattern is the brand new Daphne Bag from Clover & Violet.  The Daphne is a slouch satchel that can be worn across the body or as a should bag.  The zip top keeps your gear secure and the internal pockets keep your accessories where you need them.

Pattern Parcel #7: Choose your own price and support DonorsChoose. Win/win

I made the Daphne bag, and it was a really quick sew (and even quicker since I skipped the patchwork and handles).   I am sure you will enjoy it.


To get your Pattern Parcel #7, click the link below.

Pattern Parcel #7: Choose your own price and support DonorsChoose. Win/win


Parcel #7 Inspiration Tour Schedule:

Friday, November 7 Stitched || Sew Exhausted


Sunday, November 9 from a box || Mia's Creations || MOMENTS

Monday, November 10 owen's olivia || While she was sleeping

Tuesday, November 11 Nutta || Radiant Home Studio || La Pantigana

Wednesday, November 12 Sew Fishsticks || Stacy Sews || Stitching Insane || GnomeAngel


Saturday, November 15 Stitches by Laura || Rebekah Sews || Serger Pepper


Wednesday, November 19 Sew Like My Mom || Knot Sew Normal || Stacy Sews || sewVery


Thanks for stopping in!

xx nancy

One year ago: Easy Tote Update
Two years ago: For Judy || Felted Acorns
Three years ago: DIY Felt Acorns


10/15/2014

I can't. I'm busy.

Hey Owen.  Tonight as you were sleeping, I did my usual check and turned off your lights.  I repositioned your half hanging frame back onto the bed, and I tucked you back in under a beloved tattered quilt.  I laid down next to you.  Actually, I laid on top of you, but you didn't budge.  And I gently cried.

I cried because I knew you were the best gift God has ever given me, and I never understood that joy or love parents speak of until I had you.  I cried because I never want you to think that you are a less of priority than my book, my work, or my blog.  I cried because I knew I was guilty.  Guilty of robbing you of precious time spent between a child and a mother.   Guilty of making you think my work comes before you or that my crafts and hobbies are far more important than you.  When you were little, you were my priority, and I placed very little before you.  I savored every minute I got to spend with you.  And then I started this blog, and good, no great, things started to happen.  And then I got a publisher.  And then you became even lower on my priority list.  I cried because it was the truth.  I cried because I was ashamed.  I cried because I knew I would never get this year back.  I missed out on many memories with you, my only child, because I had a loving group of women raise you this year.  I feel awful that I blew away that precious time of watching you grow up.  I don't want you to remember me as a busy mom.  I admit, I have been selfish at times.  I am sorry.  Terribly sorry.  I really got lost in what was important to me, and I will try harder to be a better mother to you.  I miss you so much, even though you are here with me.  I'm tired of saying I can't.  I'm tired of deadlines, and I'm tired of teaching you that those things are more important than a relationship between a mother and child.  Admittedly, some of that I cannot blame on work.  The words "I can't" has almost become a trained response, and as time goes on, I find myself using the sentence more than I like.   That is why I cried tonight.  The last thing I want you to remember about me is "I can't.  I'm busy."

9/26/2014

All Natural Homemade Caramel Sauce


Hello all!  I am almost done.  It has been such a crazy, but good, experience (see last post).  It has been a long and tiring experience.  But I can't complain.  It has been SO good!

The fall and spring are my favorite times of the year here in North Carolina.  Now that the weather is cooling down,  it is great reminder that the fair is right around the corner.  Fair food.  Mmm.  Caramel apples, deep fried candy bars, cotton candy, corn dogs - the list can go on.     A few years ago I shared this recipe, and I wanted to share it again here on the blog because it is simply fabulous, and since this is not a food blog, that is saying much.  It's not the kind of caramel sauce you would make for apples, but you definitely could dip your apples into it!  I wonder if cooking the sauce longer would make it a chewier caramel appropriate for apples.  Maybe I will have to try that.   It is a great sauce for desserts (cheesecake anyone?), dipping fruit, to add to hot chocolate or tea, and it makes a great little gift for friends and loved ones.   I found this recipe several years ago in a Better Homes & Gardens magazine. It's a great recipe, and I have not made any changes to it.  It's just perfect. Tastes perfect.  Looks perfect.  Cooks perfectly.

Here is the old post.


*The felt acorns wrapped around the canning jar can be found here.*

Homemade Caramel Sauce  

3/4 cup heavy whipping cream
2 TB water
1/2 water
1 cup sugar
1/4 tsp salt
1 tsp pure vanilla extract
Oven mitt

In a small saucepan, heat on low the cream and 2 TB of water.  Do not boil the cream.  In another pot, pour the 1/2 cup of water in a 2 qt pan, and pour the sugar and salt in to form a mound in the center.  DO NOT STIR IT.  Make sure all the sugar is absorbed into the water though.  Turn the heat on medium.  Cover with lid.  Let water boil, and once all the sugar is dissolved, remove the lid.  Do not stir.  Continue to boil until the sugar syrup turns amber (light golden color).  I used a skewer and a white plate to test the color of the syrup.  Here you can see that it progresses to a golden color after the allotted time.


This process will take about 12-15 minutes, so do not get distracted and leave the stove.  In the meantime, occasionally stir the cream.  You should see steam rising from the top by the time the syrup is ready.  Take the syrup pan off the heat, and while wearing an oven mitt, slowly add the cream to the syrup and stir.  You will see LOTS of steam, so please wear your mitt!  Return back to heat and stir for 1-2 minutes.  Add 1 tsp of vanilla.  You can serve this after it cools for a little bit, and store it in the refrigerator up to one month. 


Happy Fall!

xx nancy

6/12/2014

Name-Your-Sale SALE - Modern, baby quilts on sale right now


Hello!  Thank you for stopping in to check out my sale.  This sale is a little different for two reasons.  The money will be used towards my book instead of purchasing more fabric and supplies to replenish my shop.  The second reason is you pick the discount you want to use.  It's a name-your-sale sale.  :)  I'm offering you a discount of 0% - 25% off any purchase, and you get to pick how much you want to take off.  0% would be the asking price.  This lets people decide how much they can donate.

As I mentioned in my previous post, the costs of creating a book quickly add up!  Before undertaking this huge project,  I made quilts to sell to offset the costs of my creative pursuits.  I like to make things just to make them.  Now that I have to be a big girl and do grown-up work, I have more supplies to buy and more child care to pay for to meet my deadlines.

By offering a sale, I can move product faster in hopes of having a little more immediate income to use.   I rarely offer discounts because I highly value my quilts and the hard work and time that goes into them.    I am sure you will value your new quilt just as much.  These quilts are made to last and will add an heirloom piece to your home.

Thank you for looking!


How it works:

This is a first come, first serve sale.  When you see what you want to buy, email me at owensolivia@hotmail.com with subject line SALE.  The reason for emailing instead of simply leaving a comment below is because I have had readers mention in the past they were not able to leave comments.  To avoid any mishaps, emailing is the next best thing I can think of.

To play fair, here are the rules.

  • Email me at owensolivia@hotmail.com with subject line SALE.  
    1. List the item(s) you want 
    2. List your discount amount.  It can be anything from 0% to 25% off.  
    3. Leave me the email address you want my Paypal invoice to go to.  
    4. If you are using layaway, let me know.
  • If there is more than one person interested in an item, the next person in line will receive the item if the first buyer does not pay in time. 
  • Buyer will have 24 hours to pay before item is given to the next person in line.  
  • Once an item has been paid for, I will update the item with SOLD, so you may want to check back here if you have not heard from me within a day.

Other things to note:
  • Smoke free, pet free 
  • 100% cotton quilts.  All washed and line dried.  All new.
  • Items shipped to the US is $17 (Priority Mail) and will require a signature.  I cannot be held responsible for lost or damaged packages.  If you want faster, more secure shipping, we can work something out.  As of to date, all my packages have arrived safely to people's homes.  
  • Anyone outside of the US - we will work together on the shipping price.  My guess would be anywhere from $25-$50 depending on location.  
  • Any sales placed in North Carolina will be charged a sales tax of 6.75%.
  • Your package will be mailed out about a week after your purchase.    
  • Sale runs June 12 - 30.  All quilts that have not sold will be placed back in my shop at retail price. 
  • I also offer layaway.  You will be invoiced a month later from the time of the first payment.  A $15 fee will apply.   In the event you need to cancel your sale, a $25 non refundable restocking fee will apply.   The first 24 hour payment is still required.  

QUILT A

Black Cross on white background / white birds on the back

Retails $185

34" x 42 1/2"


QUILT B SOLD

Fish quilt / black stripe for the back

Retails $220


QUILT C

Red cross on white background / blue fabric for the back (4th of July anyone?)

Retails $350

53" x 54"


QUILT D

Petal Pod on white background / Navy blue fabric on the back

Retails $210

35" x 49"


QUILT E  SOLD

Polka dots on dark gray background / orange stripe for the back

Retails $230

40" x 47.5"


QUILT F  SOLD

Triangles on white background / floral on the back

Retails $200

36" X 46"


QUILT G

Gold Cross on white background / gray chevron on back

Retails $190

32" x 40 1/2"


xx nancy

FIND ME here too!  
Personal IG account - @owensolivia
Quilting IG account - @glasshousequilts
Facebook - owen's olivia
Pinterest - nancy@owen's olivia

Copyright © owen's olivia. All Rights Reserved.
Blogger Template by The October Studio