
**You can view the newly updated room by clicking here.**
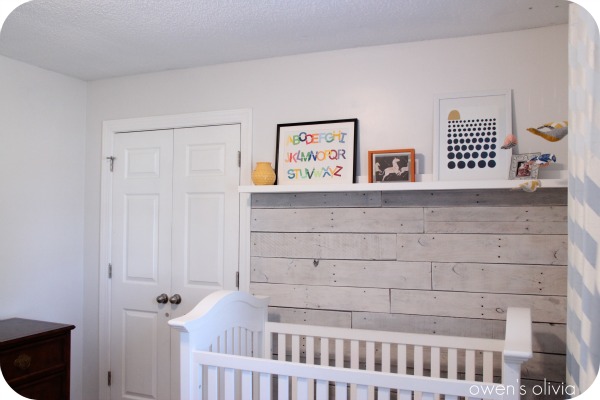
It feels SO good to have this wall done! Owen's room now has a focal point, which is just as unique and interesting as him!
l

It was a rather long process but worth it! Gathering pallets, ripping up pallets, removing all nails, measuring, cutting, sanding, screwing them into the wall, and whitewashing the wood using this technique. whew! Our home was looking rather ghetto with all the pallets piled up in our carport. Remember this lovely shot?

So the pallet wall came about in several ways. First, I saw all the awesome pallet walls done on the web, and I really liked them. Second, I knew I wanted the wall to be a little different. Third, I am lazy. I didn't want to cut all that wood, but I was willing to do it. One day I was thinking about gallery walls, which gave me the thought to add a shelf to the top of my pallet boards to create my own gallery wall! And I love how I do not have to hang anything above the boards. I can just simply place and rearrange pictures on the shelf!

I used one of Ana White's plans to make the shelf. Did you notice the orange frame? Well, it houses an advertisement from a House Beautiful magazine. Gold, arrows, and zebras??? Yes, please!

*If you know why this photo came out on the blue-er side, do share. I'm still trying to understand my new camera.
I also made a mini bird mobile, which I think I will add one or two more and arrange them in a corkscrew fashion. When I first put the birds up, Owen would wake up and smile and point at them. He would sign bird and say "Tweet. Tweet." So adorable! Now he just giggles at the birds most days.
Update: You can see the "new" mobile here.

I didn't decide on whitewashing the wood until later on after I had placed the wood on the walls. I did love its rustic charm as is, but I wanted it to be lighter and more on the white/gray side.
I made sure to leave the flaws in the wood alone, and I also didn't want the pallets to match up perfectly.


What makes this even MORE AWESOME??? When the crib is gone, a nice little twin (or even a desk!!) will look incredible in its place. I will then have a decorative headboard, and there will be enough room to place a nightstand next to the bed. So this pallet wall grows with my little guy! And don't worry, I made sure this shelf was within little fingers reach, and I didn't screw it into the studs for extra strength. I kid. I kid.

Do you remember my old wall color?

I wanted to go lighter and whiter and brighter! I LOVE this color on his walls!! It has the slightest hint of gray so it's not as white as the trim. It's a nice, cool, neutral color, which allows me to change up the colors in the room through accessories.


*You can see the newly updated room by clicking here.**
xx nancy
My quilting book released Sept. 24, 2015 and is on Amazon. Check it out!

It feels SO good to have this wall done! Owen's room now has a focal point, which is just as unique and interesting as him!
l

It was a rather long process but worth it! Gathering pallets, ripping up pallets, removing all nails, measuring, cutting, sanding, screwing them into the wall, and whitewashing the wood using this technique. whew! Our home was looking rather ghetto with all the pallets piled up in our carport. Remember this lovely shot?

So the pallet wall came about in several ways. First, I saw all the awesome pallet walls done on the web, and I really liked them. Second, I knew I wanted the wall to be a little different. Third, I am lazy. I didn't want to cut all that wood, but I was willing to do it. One day I was thinking about gallery walls, which gave me the thought to add a shelf to the top of my pallet boards to create my own gallery wall! And I love how I do not have to hang anything above the boards. I can just simply place and rearrange pictures on the shelf!

I used one of Ana White's plans to make the shelf. Did you notice the orange frame? Well, it houses an advertisement from a House Beautiful magazine. Gold, arrows, and zebras??? Yes, please!

*If you know why this photo came out on the blue-er side, do share. I'm still trying to understand my new camera.
Update: You can see the "new" mobile here.

I didn't decide on whitewashing the wood until later on after I had placed the wood on the walls. I did love its rustic charm as is, but I wanted it to be lighter and more on the white/gray side.
I made sure to leave the flaws in the wood alone, and I also didn't want the pallets to match up perfectly.


I wanted to go lighter and whiter and brighter! I LOVE this color on his walls!! It has the slightest hint of gray so it's not as white as the trim. It's a nice, cool, neutral color, which allows me to change up the colors in the room through accessories.

Originally, boards were placed to the left of the closet doors as well. I thought it looked odd, especially since one side was going to have a shelf on it. So I ripped them out.


Because we all love before and afters, here is the before shot.


Total cost so far:
Paint - $22
Wood- Free
Ana White Shelf - $10
Custom Chevron Curtains - $42 (with coupons)
Curtain Rod- $15
Yellow Honey Bee Pot- $5 at TJ Maxx
Alphabet Paint Chip Artwork - Free
Marimekko Sunrise Art - Free
Fabric Bird Mobile- Free
Golden Zebra Artwork- Free (came out of a magazine)
Total: $94
xx nancy
My quilting book released Sept. 24, 2015 and is on Amazon. Check it out!
This is amazing! Great job! I can't believe how beautiful it is in a nursery! What a fabulous idea!
ReplyDeleteMelody
ChattyChics.com
PS Will you link this up at my place on Wednesday so I can feature you?
What a beautiful room! I found your blog on Homemaker on a Dime's party. I'm your newest follower. Megan
ReplyDeleteWhat a cute idea! Love those chevron curtains too!
ReplyDeleteLooks amazing!!! Love the shelf above the pallets, and your artwork looks awesome!
ReplyDelete(Try playing with your white balance....that should solve the problem of your picture looking blue!)
This is beautiful! I'd love for you to share this clever idea at Mix it up Monday:
ReplyDeletehttp://flourmewithlove.blogspot.com/2012/03/mix-it-up-monday.html
I hope to see you soon:)
You did a great job, Nancy! It looks professional! So, when are you coming to do that to my house??
ReplyDeleteYay! You got featured at C.R.A.F.T.!
DeleteNancy, it looks FANTASTIC! :)
ReplyDeleteNancy! That is so cute! It turned out amazing!
ReplyDeleteThis is gorgeous!! You did a great job!
ReplyDeleteBravo! Looks great.
ReplyDeleteThank you Nancy!
DeleteThis looks so cute! What a great focal point and very creative! Good job!
ReplyDeleteI love that idea! Thanks for sharing! I also love your bird mobile and would love to know how you made it!
ReplyDeleteThank you! I will be sharing the bird mobile later this week, so don't forget to check it out!
DeleteWow! As if I didn't already want another baby! I LOVE your whole nursery!! That pallet wall is just to die for! I'd love for you to stop by and share at my party going on now. : ) Hope to see you there!
ReplyDeletehttp://www.cherishedbliss.com/2012/03/craft-and-tell.html
That looks super fantastic! I am completely jealous lol. Great job :)
ReplyDeleteYour pallet wall looks amazing and I love the choice of color on your walls. Everything looks so lovely. Hope you will visit Magnolia Cottage.
ReplyDeleteLisa
How neat is his room!!! I LOVE IT! That is awesome Nancy!
ReplyDeleteThank you Leigh! :)
DeleteLooks awesome :) I have seen quite a few people making walls with wood planks. I'm too much of a wuss to try it haha but his room looks amazing!
ReplyDeleteI also love the curtains.
-Jamie
What a great room. I love the combo of the rustic wall with the clean colors and modern accessories.
ReplyDeleteThank you. It's so nice to have a neutral wall color. I'm so use to having colored walls in my home that this is a nice change.
DeleteGorgeous! It really belongs on Apartment Therapy/Ohdeeoh. Nicely done :)
ReplyDelete~Elena
http://acasarella.blogspot.com
That is amazing!!! Absolutely beautiful nursery.
ReplyDeletewww.itsybitsypaperblog.com
Well now that is just too cute!!!! I love it!
ReplyDeleteFound you at home stories a to z....
Jen
athomeinthenorthwestblog.com
Thank you Jen!
Deleteawesome! I love how the wall turned out great job! Dying to do that to my kitchen island.
ReplyDeleted e n i s e
I really love the pallet wall with the white wash. Great idea to put a shelf on top - I love all the color you added to the shelf. Cute curtains too!
ReplyDeleteGorgeous Nancy! Job well done.
ReplyDeleteSO CUTE, girlie!! Love it. :))
ReplyDeleteLOVE how that room turned out! Your pallet wall looks amazing and your curtains and pic and mobile - so perfect together!
ReplyDeleteWhat a beautiful room! That wall is fabulous and I love those curtains too.
ReplyDeleteOh wow this is awesome! I've pinned it to save for when I have a nursery to decorate someday :)
ReplyDeleteWow! What a great project!
ReplyDeleteWhen you reupholster you rocker/glider will you please share the how to? I've been putting off that same project in my gal's nursery for over a year. It's on my to-do list, but as a beginning sewer, the idea of recovering totally intimidates me!!
Adorable! You did a fantastic job! What a sweet haven for your little one! Thanks so much for sharing in the DIY Project Parade, Nancy!
ReplyDeleteLove this Nancy!! It makes such an impact on the nursery! I'm featuring you today!
ReplyDeletehttp://craptastickatie.blogspot.com/2012/03/five-feature-friday-29.html
I love that this will transfer to a big boy room as well, it is great! I love you blurb that this was to get you off your butt, that is totally what my blog has done for me as well!
ReplyDeletelove the wood wall - and the new wall colour.
ReplyDeleteit all looks fabulous - and great thinking about life after the cot!!!
babies grow up so so fast. (mine are now 16, 13 and 9!!)
have a great week.
cheryl xox.
Wow, that looks SOOOOOO good! My favourite part is how you tied in the ledge on top for display. It's perfect.
ReplyDelete:)
P.S. Love the ideas as I'm working on a little dude's room right now, too.
Featured on Facebook! So incredible! Again, great job!
ReplyDeleteMelody
I LOVE it!!! So cute - I love the birds and the pallet wall!
ReplyDeletethat is AMAZING!!! I love it so much!! you are so creative, I never would have thought of something like that. Great job!!
ReplyDeleteSeriously, this room is incredible. I am saving this to do in a room for my baby one day. Thank you so much for the inspiration, it turned out beautifully.
ReplyDeleteThe photo is blue because your camera is trying to balance the color of the orange frame (blue and orange are complementary or opposite colors) To fix this, you need to meter on something that is a neutral gray and then, take the photo.
ReplyDeleteI love this...I have been wanting to do one in my Master Bedroom!!! It looks AWESOME!!!
ReplyDeleteBrooke
Startathome.blogspot.com
Thank you Brooke! It would look great in a master too.
DeleteI am SOOOO in LOVE!!! You did a FABULOUSE job! I just pinned it and shared it on my Facebook:) I have been wanting to do a beadboard wall with trim, but this just may take it's place.
ReplyDeleteDesiree
CamelotArtCreations.blogspot.com
Thanks Desiree! The pallet wall is cheaper than beadboard! Maybe that idea might tempt you even more. ;) Thank you for sharing it with your readers on FB. And thanks so much for leaving me a comment and spreading the love! Have a great week! :)
DeleteGAH!!!! I am in LOVE with the woodwork behind the crib. What a fantastic idea, great job!!
ReplyDeleteFlash can cool a photo but some (cheap?) cameras tilt more toward the blue side than others.
ReplyDeleteI wouldn't consider a Canon T3i cheap, but maybe it does lean more to the blue side? It may just be my white balance. It's a new camera and I am not familiar with all the fancy things it does yet.
DeleteSuper cute! Pinned it :)
ReplyDeleteWhat a well thought out beautiful nursery. I am in awe of your style and creativity. Pinned it of course! Great job!
ReplyDeleteI love this idea and the room is beautiful. But (and this is a BIG BUT!) all pallets are sprayed/soaked in some pretty toxic and heinous bug sprays and things like formaldehyde as a preservative. I would be very hesitant to let my child or myself be exposed to the vicious outgassing that continues for years. That's why they don't recommend burning pallet wood in stoves for heat. People can end up with COPD, lung disease, and nervous system damage. Anytime you pick an industrial material to use in your home you should always find out the history of the item or how its made. That's why so many industrial buildings are rarely turned into housing, too many toxic materials left behind in the walls, floors, and dirt surrounding. Even heavy marine sealant will usually not prevent outgassing, the chemicals literally burn right through.
ReplyDeleteHi Kimber. I really do appreciate your concerns. Though I am not 100% certain that my wood is not treated, most of the pallets I used came from rotted wood. I would disagree and say that not all pallet wood is treated. As for outgassing, I think we are exposed to lots of things that are outgassing in our homes. My son's clothing is treated with chemicals to prevent it from being flammable. My deck is made from treated wood. The food I eat in the grocery store has been sprayed with chemicals and transported on pallets. I don't even want to think about the preservatives in food. I do care about my family and our safety, but I don't want to live in a bubble either. The best thing for me to do is to contact the pallet company that supplied them, and make an informed decision from there.
DeleteA link I found that might help.
Deletehttp://technology.theownerbuildernetwork.co/2014/07/02/pallets-fact-and-fiction-or-how-to-tell-a-safe-pallet-from-a-toxic-one/
Love your creative wall treatment! I found your blog from BetterAfter. Totally just pinned this project! :)
ReplyDeletei love this reclaimed wood wall with the shelf on top. very creative. adorable room!
ReplyDeleteVery creative!
ReplyDeleteThe nursery looks amazing and unique. great job!
Great blog! I love the wood wall! My head is spinning with ideas now! Where did you pick up the pallets?
ReplyDeleteThank you! I picked up the wood at Benjamin Moore, but I am sure you can find pallets just about anywhere. If it is green, don't get it!
DeleteThis is amazing! You did a great job!
ReplyDeleteTo address your blue picture issue, it has to do with the "white balance" setting on your camera. It was probably set for incandescent light, but you had a lot of natural light shining in that area at the time of the picture.
ReplyDeleteGreat-looking wall, though. I'm thinking something similar (but with the boards vertically oriented) in our entryway at the 'triangle wall' under the stairs.
Thank you. I was still learning to use my new camera, and I wasn't too familiar with the WB yet. Now I use it every time I turn on the camera! Best of luck when you make yours!
DeleteThis wall is AMAZING. Im book marking this for future reference when we have a baby! Thanks for sharing this with us!
ReplyDeleteThis comment has been removed by the author.
DeleteI love this wall! I want to do something similar in our son's nursery. I have a question about the execution. How did you handle the baseboards? Did you remove them and put them on over the boards? If you have a chance to explain (or if I missed it somewhere else on your blog) please let me know!
ReplyDeleteSo cool! Love the shelf on top, too.
ReplyDeleteQuestion did you seal it at all or just sanded it before to make it smooth?
ReplyDeleteI'm curious where you were able to snag those pallets for free?! Thanks!
ReplyDeleteI went to my local paint store. :)
Delete